Mussolini

Richard J.B. Bosworth (2002)

I’ve wanted to read a biography of Mussolini for a while, and this one is very good. A reviewer quote on the cover describes it as “lucid, elegant, and a pleasure to read,” and I’d have to agree. It’s somewhat more “literary” than some biographies, and as a result doesn’t always cover the historical context as well as one might like: the author’s description of the March on Rome, for example, is extremely brief despite it’s significance for Mussolini’s rise. In this way it’s not like many Hitler biographies (for example Hitler or Hitler and Stalin: Parallel Lives) which are as much about events as personality. One also has to get past the author’s repetition of words like “euphonious” and “lucubrations”, which get tiresome after a while. Having said all that, this is an excellent biography, full of insight and pointers to other sources (with over 80 pages of footnotes), and is a good overview to the career of someone often written off too quickly.

4/5. Finished Wednesday 10 July, 2013.

(Originally published on Goodreads.)

Temperature sensors working

Temperature sensing using digital temperature sensors is easy to get working.

The temperature sensing part of the project requires three sensors for ambient, high-up and low-down measurement. The DS18B20 temperature sensor seems well-suited for the job.

DS18B20

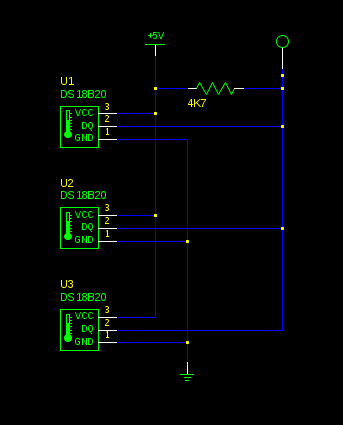
Three DS18B20 temperature sensors sharing a OneWire bus, standard (rail) power mode

Hooking-up a OneWire bus for the three sensors lets them share a single microcontroller pin — which isn’t important for hardware reasons in this project, but also saves some microcontroller RAM, which might be. The circuit is very simple, with the three sensors sharing power and ground lines and with a common data line pulled-up to the power rail through a 4.7K resistor. The DQ line is attached to one of the Arduino’s digital lines. The OneWire library is then used to instantiate a protocol handler for that line, and passed to the temperature control library to manage the interaction with the devices, including their conversion from raw to “real” temperature values.

The resulting code is almost comically simple:

#include <DallasTemperature.h>

OneWire onewire(8);                  // OneWire bus on pin 8
DallasTemperature sensors(&onewire);

void setup(void) {
  Serial.begin(9600);
  sensors.begin();
}

void loop(void) {
  sensors.requestTemperatures();
  for(int i = 0; i < 3; i++) {
    float c - sensors.getTempCByIndex(i);
    Serial.print("Sensor ");   Serial.print(i);   Serial.print(" = ");
    Serial.print(c);   Serial.println("C");
  }
  delay(5000);
}

That’s it! The temperature library packages everything up nicely, including the conversion and the interaction with the OneWire protocol (which is quite fiddly).

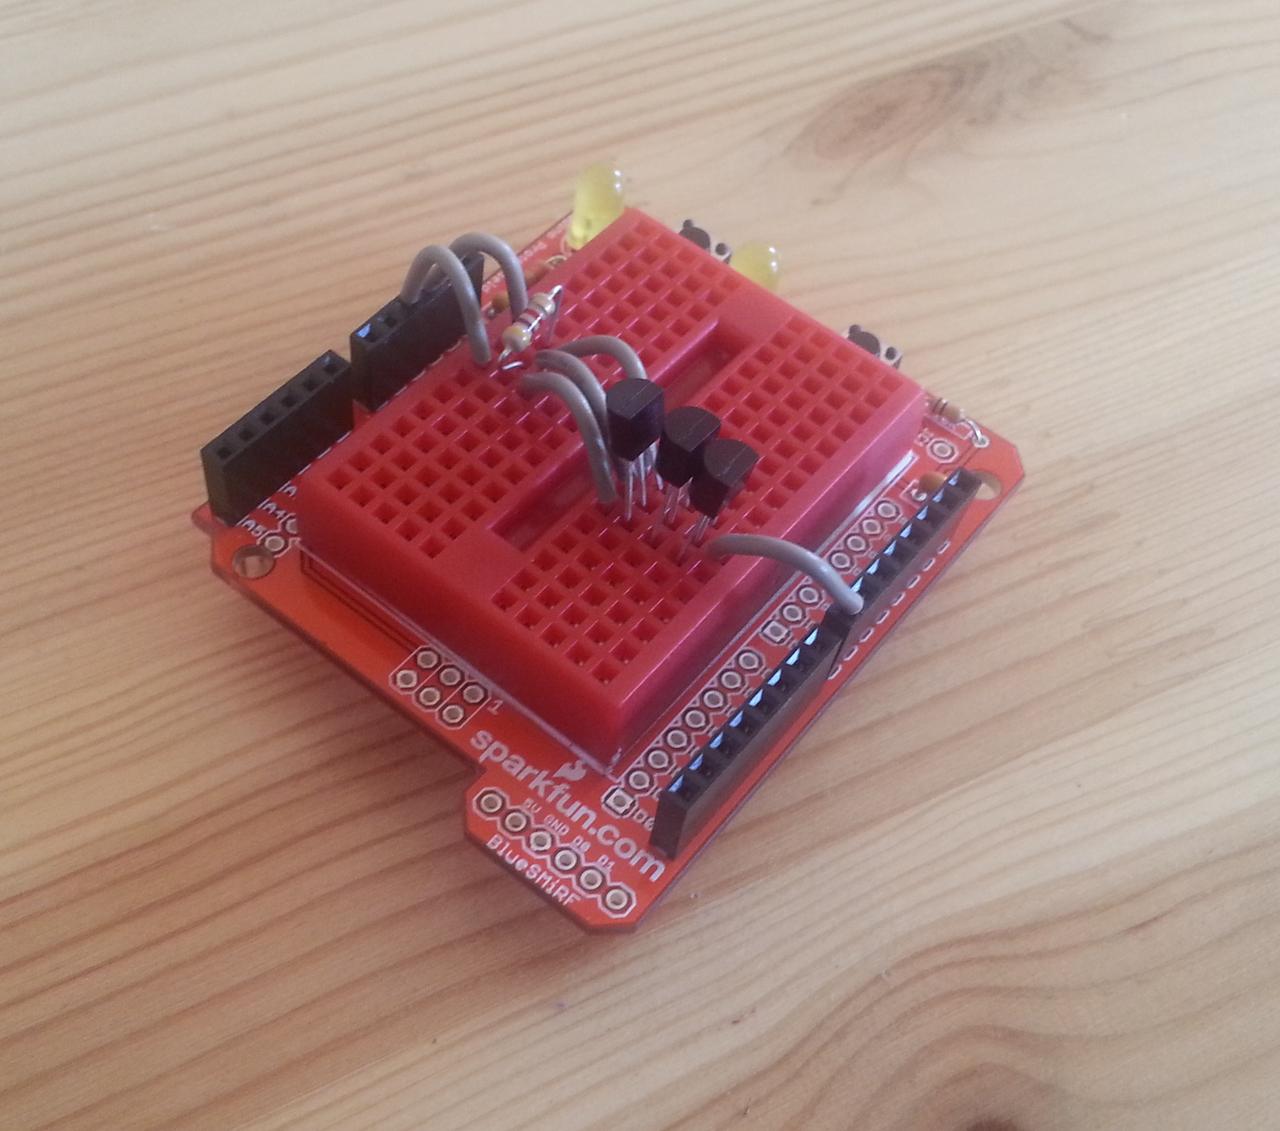
Three DS18B30s on a prototyping shield

One potential problem for the future is that access to the sensors is by index, not by any particular identifier, and it;s not clear whether the ordering is always the same: does the sensor closest to the microcontroller always appear as index 0, for example? If not, then we’ll have to identify which sensor is which somehow to sample the temperature from the correct place, or run each one on a different OneWire bus instance.

There’s also an interesting point about parasite power mode, which is where the DS18B20 draws its power from the data bus rather than from a dedicated power rail. This might make power management easier, since the sensor would be unpowered when not being used, such as when the Arduino is asleep. This suggests it’s probably worth looking into parasite power a bit more.

DS18B20 digital thermometer

The DS18B20 is a programmable digital thermometer that needs no calibration and uses only one wire of the microcontroller.

The DS18B20 is extremely popular as a temperature sensor, for obvious reasons: they’re digital, and require no calibration, in contrast to using a thermistor or similar analogue device which would need to be characterised against reference temperatures. They’re not as cheap as analogue components, but their simplicity of use and accuracy probably make up for that in scientific applications.

The devices are also notable as using the OneWire protocol developed by Dallas Semiconductor (now Maxim) and used in (amongst other devices) their iButton devices. Essentially OneWire is an embedded systems equivalent of USB that allows a set of devices to be chained together and addressed using only one pin on a microcontroller. This means that there’s no real limit on the number of sensors that even a small chip can make use of. The datasheet is available if needed, but they’re so easy to use and have such good software support (see below) that there’s no real need to refer to it.

The sensors are packaged almost like transistors, with three wires for ground, power, and data. The easiest way to use them is to power them directly with 5V and ground, and use the third wire for communications. (There’s also a “parasitic” mode that takes power from the data bus, which I haven’t got to work yet.) The communications line is the “one wire” that runs the communications protocol.

Using OneWire devices, and DS18B20s in particular, is made very simple by the existence of two libraries, providing the protocol driver and temperature conversion and packaging respectively. Links and installation instructions can be found on the 3rd-part tools and libraries page.

API communications now working

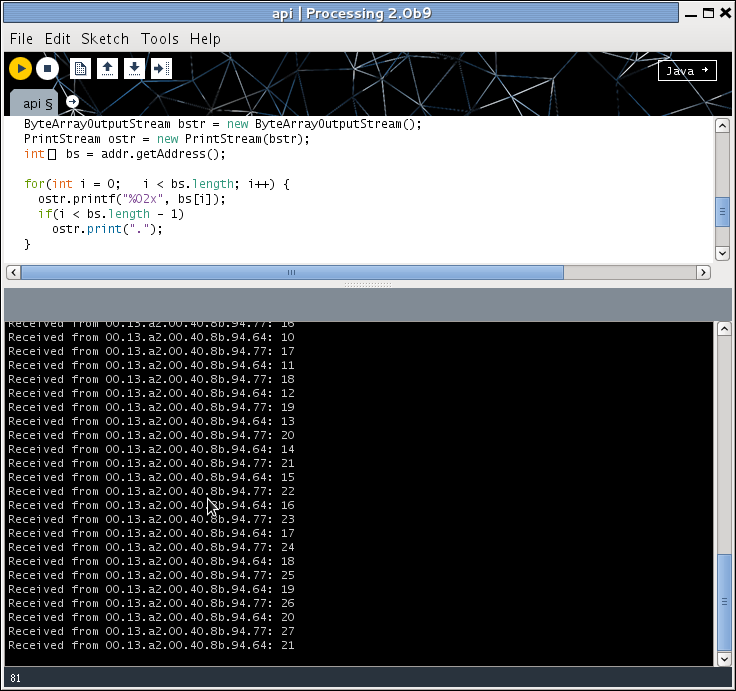
A small sensor network now working, with two edge devices talking to a base station.

Network

This step of the project accomplishes two things: is gets API networking mode working for the XBee radios, and makes sure the the interaction between software on the Arduinos and software running on the base station work too.

The data stream is simple enough: each Arduino counts up from 0 to 255 every 5s, passing the result up to the co-ordinator radio. A Processing program on the laptop collects the numbers and prints them. Naturally they become somewhat intertwined as their clocks aren’t quite synchronised.

Actually this is enough to perform a simple radio survey to check transmission distance: we can move the radios away from the base station until they lose contact (nominally 100m for these 2mW radios, in reality probably substantially less), then move back into range, and then move one of the radios again to check that it meshes with the intermediate node in reaching back to the base station. This will also check that battery power works.

Meshing

The software is quite straightforward, and the xbee-arduino library handles all the low-level communications — although it’s very low-level, fine for the experienced programmer but probably all but mystifying to anyone not used to this kind of software. The corresponding Java xbee-api library is slightly more friendly, but only slightly: they probably both need wrapping into a framework that hides the radio nastiness.

I think the biggest hurdle for this sort of system is the data format — or, more precisely, the need (or desire, at least) to to use C at one end and Processing/Java at the other, which means that the data on the wire is being described twice. A framework approach could use (for example) JSON, although there’d still be a need to make sure it was compactly encoded and transmitted.

The xbee-arduino library

A library for using XBee radios with Arduinos.

The XBee radio operates in two modes: transparent or text-based, and API or binary-based. The latter (API mode) is generally considered more suitable for computer-to-computer interactions, as it’s faster and simpler for computers to manipulate. However, using an XBee in this mode requires additional software.

The xbee-arduino library provides Arduino functions to access the API mode functionality of the various XBee radio modules. The library is quite low-level, but does provide access to all the necessary functions like issuing AT commands to control the modem and sensing and receiving packets of data to other radios in the mesh network.

To use the library you download the latest version from the web page and unpack it into the libraries/ directory of your Arduino IDE. You also need to make sure that the radios you use have the API function set installed using X-CTU, as the library only makes sense for radios in API mode. You also have to set the “AP” parameter to 2 when writing the firmware.